Contents
Introduction
If you’re looking to understand abdominoplasty incisions, you’ve come to the right place. The abdominoplasty procedure, commonly known as a tummy tuck, involves removing excess skin and tightening muscles to create a smoother, firmer abdominal profile. This procedure is highly personalized and tailored to meet individual needs, ensuring optimal results and enhanced self-confidence.
Quick Facts About Abdominoplasty Incisions:
1. Incisions are made based on the amount of excess skin and desired results.
2. Common incision areas include the lower abdomen and around the umbilicus (belly button).
3. Proper care and follow-up are crucial for incision healing.
The key to a successful abdominoplasty is selecting the appropriate incision type and managing aftercare meticulously. Below, we will break down the different incision types and how they impact the procedure’s results and recovery time.
With this understanding, you’ll be well-prepared to discuss your options with your surgeon for the best possible experience and outcome.
Understanding Abdominoplasty Incisions
Types of Abdominoplasty Incisions
When it comes to abdominoplasty, the type of incision plays a crucial role in the procedure’s success and your recovery. Here are the main types of abdominoplasty incisions:
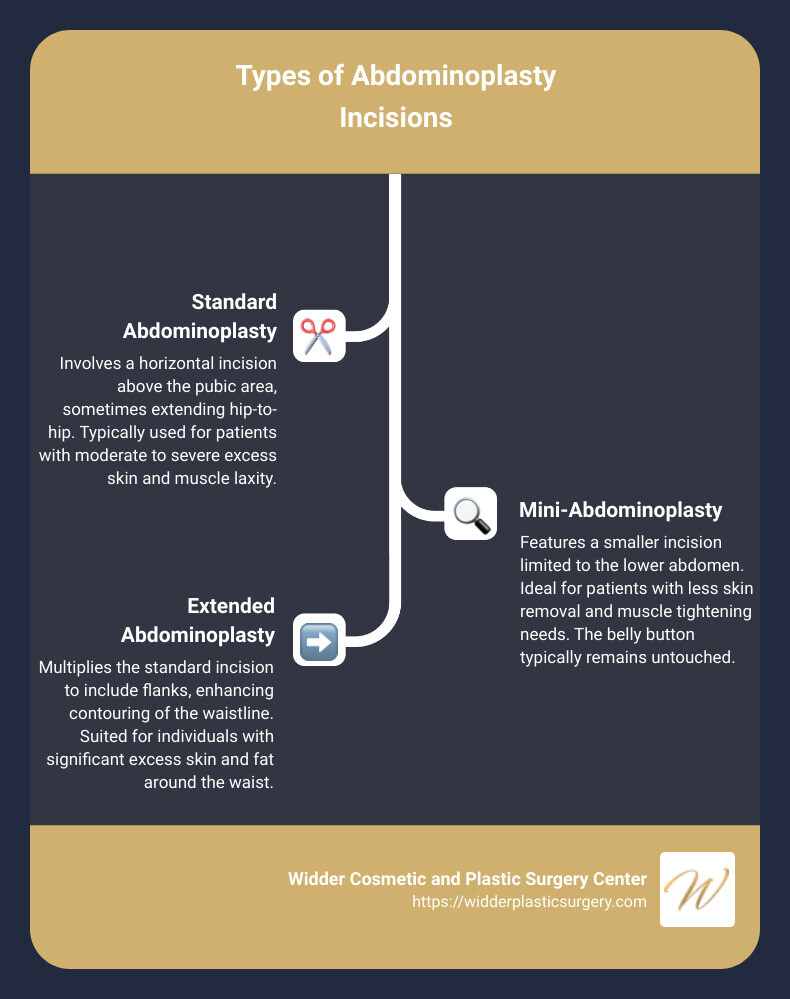
Standard Abdominoplasty: This is the most common type. The incision is made from hip-to-hip, just above the pubic area. This allows the surgeon to remove a significant amount of excess skin and tighten the abdominal muscles.
Extended Abdominoplasty: For patients with excess skin extending to the flanks or sides, an extended incision is used. This type starts from one hip, goes across the lower abdomen, and ends at the other hip. It can also include a vertical incision.
Mini-Abdominoplasty: Ideal for patients with minimal excess skin and fat below the belly button. The incision is shorter, usually between the hips, and does not involve repositioning the belly button.
Umbilical Incision: Sometimes, a separate incision around the belly button is necessary to remove excess skin in the upper abdomen. This is often combined with other incision types.
Suprapubic Incision: This low horizontal incision is made just above the pubic hairline, making the scar easily concealable under underwear or swimwear.
Factors Influencing Incision Choice
Several factors determine the most suitable incision type for your abdominoplasty:
Excess Skin: The amount and location of excess skin are critical. More extensive skin laxity may require a longer incision.
Muscle Laxity: If the abdominal muscles are significantly weakened or separated (often due to pregnancy), a more extensive incision might be needed to repair them.
Patient Anatomy: Each patient’s body is unique. Your natural body shape, fat distribution, and skin elasticity will influence the incision type.
Desired Outcomes: Your goals for the procedure, such as how flat and tight you want your abdomen to be, will also play a role.
Surgeon’s Expertise: Your surgeon’s experience and preferred techniques are crucial. A skilled surgeon can choose and execute the best incision type to achieve optimal results while minimizing scarring.
Understanding these factors helps in making informed decisions about your abdominoplasty incision. Discussing these with your surgeon ensures you choose the option that best meets your needs and expectations.
Next, let’s delve into the abdominoplasty procedure itself, breaking down each step from anesthesia to skin removal.
The Abdominoplasty Procedure
Step-by-Step Process
Anesthesia: To ensure comfort during the surgery, anesthesia is administered. Options include intravenous sedation and general anesthesia. Your surgeon will recommend the best choice for you based on your medical history and the complexity of the procedure.
Incision: The type of abdominoplasty incision depends on the amount of excess skin and the desired results. Typically, a horizontally-oriented incision is made between the pubic hairline and belly button. For more extensive cases, a second incision around the navel might be necessary.
Muscle Repair: After making the incision, the surgeon lifts the abdominal skin to access the underlying muscles. Weakened abdominal muscles are then repaired and tightened using sutures. This step is crucial for creating a firmer abdominal wall.
Skin Removal: The surgeon pulls down the upper abdominal skin, trims the excess, and repositions the remaining skin. This process is similar to pulling down a window shade and cutting off the extra fabric.
Belly Button Repositioning: A new opening for the belly button is created. The belly button is then popped through to the surface and sutured into position, ensuring a natural look.
Suturing: The incisions are closed using sutures, skin adhesives, tapes, or clips. Multiple layers of sutures are often used to strengthen the closure and minimize tension on the skin.
Post-Operative Care
Incision Care: Proper care of the incision site is vital for healing. Keep the area clean and dry, and follow your surgeon’s instructions on how to care for the wound.
Wound Healing: Healing varies from person to person but generally takes several weeks. You may experience swelling, bruising, and numbness, which are normal parts of the healing process.
Scar Management: Scarring is a natural outcome of surgery. Your surgeon will place incisions in less noticeable areas and provide tips to minimize scarring. Over time, scars will fade but may take up to a year to fully improve.
Topical Ointments: Your surgeon may recommend topical ointments to aid in the healing process and reduce scarring. Always use products as directed by your healthcare provider.
Follow-Up Visits: Regular follow-up visits with your surgeon are essential to monitor your progress. These visits allow your surgeon to assess healing, remove any non-absorbable sutures, and address any concerns you might have.
Taking these steps seriously ensures a smoother recovery and helps achieve the best possible results from your abdominoplasty.
Next, we’ll cover the healing and recovery process, including tips for optimal recovery and managing post-surgery pain.
Healing and Recovery
Tips for Optimal Recovery
Healing Timeline: Recovery from an abdominoplasty generally takes several weeks. Most people start to feel more like themselves after a couple of weeks, but complete healing can take up to 12 months. During this time, you’ll notice the scar fading and the swelling reducing gradually.
Scar Fading: Scars are a natural part of the healing process. Over time, they will fade and become less noticeable. Using recommended products like silicone sheets or gels can help improve the appearance of scars. Always consult your surgeon before starting any scar treatment.
Post-Surgery Pain Management: It’s normal to experience discomfort and soreness after surgery. Your surgeon will prescribe pain relievers to manage this. Over-the-counter pain medications like acetaminophen can also be used, but avoid aspirin or ibuprofen unless approved by your doctor, as they can increase bleeding.
Activity Restrictions: For the first few weeks, avoid strenuous activities like heavy lifting, running, or intense workouts. This helps prevent complications and supports the healing process. Light activities, such as walking, are encouraged to improve blood flow and reduce the risk of blood clots.
Keeping Incision Clean: Proper care for your abdominoplasty incision is crucial. Keep the incision area clean and dry to prevent infections. Follow your surgeon’s instructions on how to clean the wound and change dressings.
Dressing Changes: Your surgeon will provide specific guidelines on how often to change your dressings. Always wash your hands thoroughly before touching the incision site to avoid introducing bacteria.
Avoiding Strenuous Activities: Even after your initial recovery period, ease back into your regular activities. Listen to your body and avoid pushing yourself too hard. Gradually increase your activity level as you feel more comfortable.
Using Recommended Products: Products like compression garments can help reduce swelling and support your abdomen as it heals. Topical ointments prescribed by your surgeon can aid in the healing process and minimize scarring.
By following these tips, you can ensure a smoother recovery and enjoy the best possible results from your abdominoplasty. Healing takes time, so be patient with your body and give it the care it needs.
Frequently Asked Questions about Abdominoplasty Incisions
What incision is used for abdominoplasty?
The standard incision for an abdominoplasty is typically made in the lower abdomen, just above the pubic hairline. This allows the surgeon to remove excess skin and tighten the underlying muscles. The length and shape of the incision depend on the amount of excess skin and the desired results. For a full tummy tuck, the incision often extends from one hip to the other, ensuring that the final scar can be easily hidden by underwear or a bikini.
How long does it take for abdominoplasty incision to heal?
The healing process for an abdominoplasty incision varies, but it generally takes 6-12 months for the scar to fully mature. Initially, the incision will appear red and raised, but over time it will fade and flatten. Using topical ointments prescribed by your surgeon can help improve the appearance of the scar. It’s important to follow your surgeon’s post-operative care instructions to promote optimal healing and minimize complications.
What is the umbilical incision for abdominoplasty?
The umbilical incision is a key part of many abdominoplasty procedures. This involves making an incision around the belly button to detach it from the surrounding skin. The skin is then pulled down, and a new opening is created for the belly button in the waist crease. The belly button is then repositioned and sutured into place. This technique ensures that the belly button remains in a natural position and is properly attached to the abdominal wall and muscle.
By understanding these aspects of the procedure, you can better prepare for your abdominoplasty and know what to expect during the recovery process.
Conclusion
At Widder Cosmetic and Plastic Surgery Center, we pride ourselves on providing personalized care tailored to each patient’s unique needs and aesthetic goals. Located in Northern Virginia, our facility is just a short drive from Washington, D.C., offering a serene and private environment for your cosmetic journey.
Dr. Shlomo Widder, our board-certified plastic surgeon, brings extensive experience and a compassionate approach to every procedure. Whether you’re considering a standard abdominoplasty, extended abdominoplasty, or mini-abdominoplasty, Dr. Widder and his exceptional team are dedicated to helping you achieve the best possible outcomes.
Our extensive range of procedures ensures that we can address all your cosmetic concerns, from body sculpting to facial rejuvenation. At Widder Cosmetic and Plastic Surgery Center, your comfort and satisfaction are our top priorities.
For more information about our abdominoplasty services and to schedule a consultation, visit our Tummy Tuck (Abdominoplasty) page.

